Some of the links in this post might be affiliate links. This means that if you click on the link and make a purchase, I’ll receive a small commission – at no extra cost for you, which helps me cover the costs for this blog
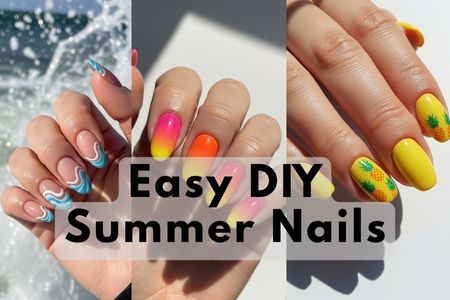
Summer is all about bold colors, playful designs, and beachy vibes the perfect season to experiment with nail art! Whether you’re lounging at the beach or sipping lemonade in your backyard, these easy DIY nail looks add a sunny spark to your style. Plus, doing them at home means saving money while having fun. From tropical patterns to fruity details, these summer nails 2025 designs are bright, mood-lifting, and totally Insta-worthy!
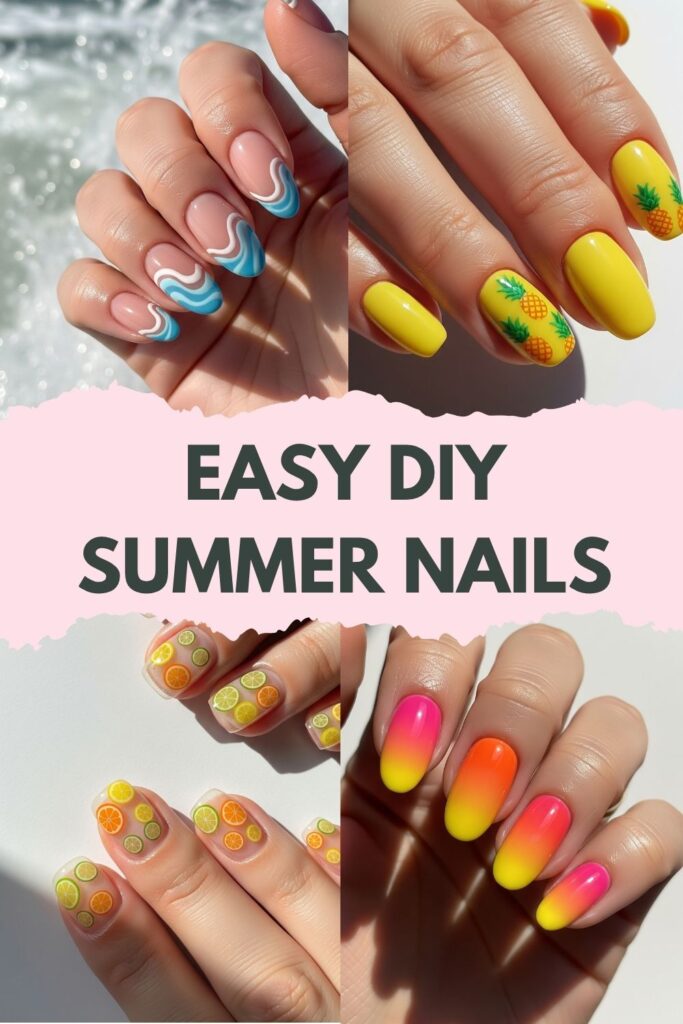
15. Pineapple Pop Nails
This fruity design screams tropical vacation! I love how the bright yellow base and tiny green pineapple leaves instantly bring summer to your fingertips. It’s playful, fresh, and totally beach-ready perfect for summer nails 2025.
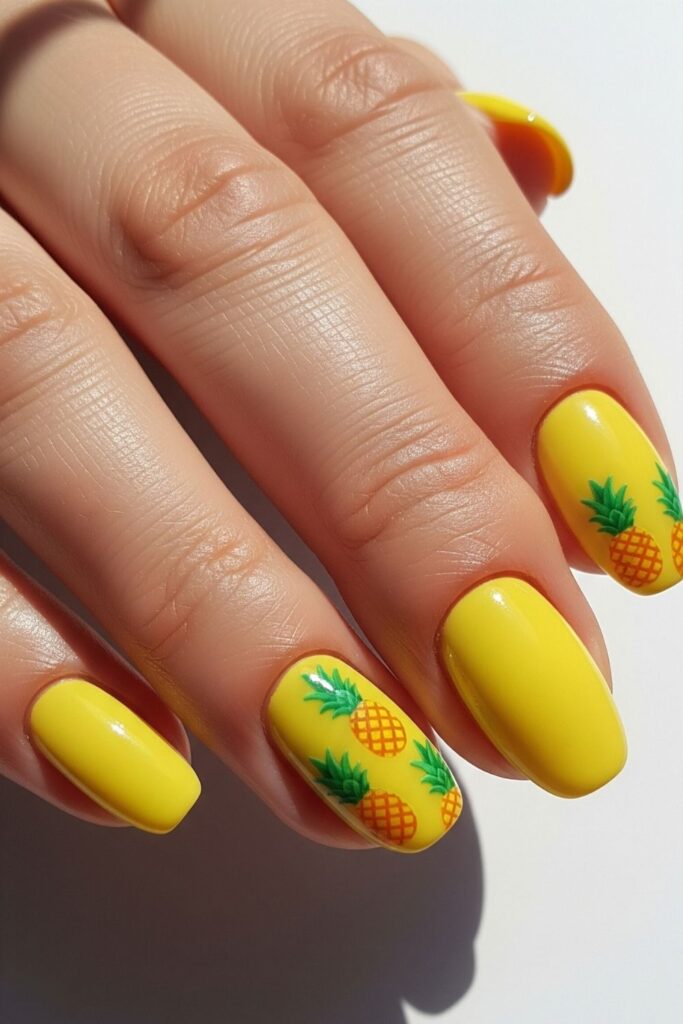
Tools Needed: Yellow polish, green polish, thin nail brush or dotting tool, top coat.
DIY Steps:
- Nails are cleaned and shaped.
- A yellow polish is applied as the base and dried.
- Small diagonal lines are drawn with a thin brush to mimic the pineapple skin.
- Tiny green leaves are painted at the top using a dotting tool or brush.
- A top coat is applied for shine.
14. Ocean Wave Tip Nails
These ocean-inspired French tips are so calming. I love how the swirly blue and white lines look like waves gently crashing on the shore. They’re elegant yet fun just right for beach nails.
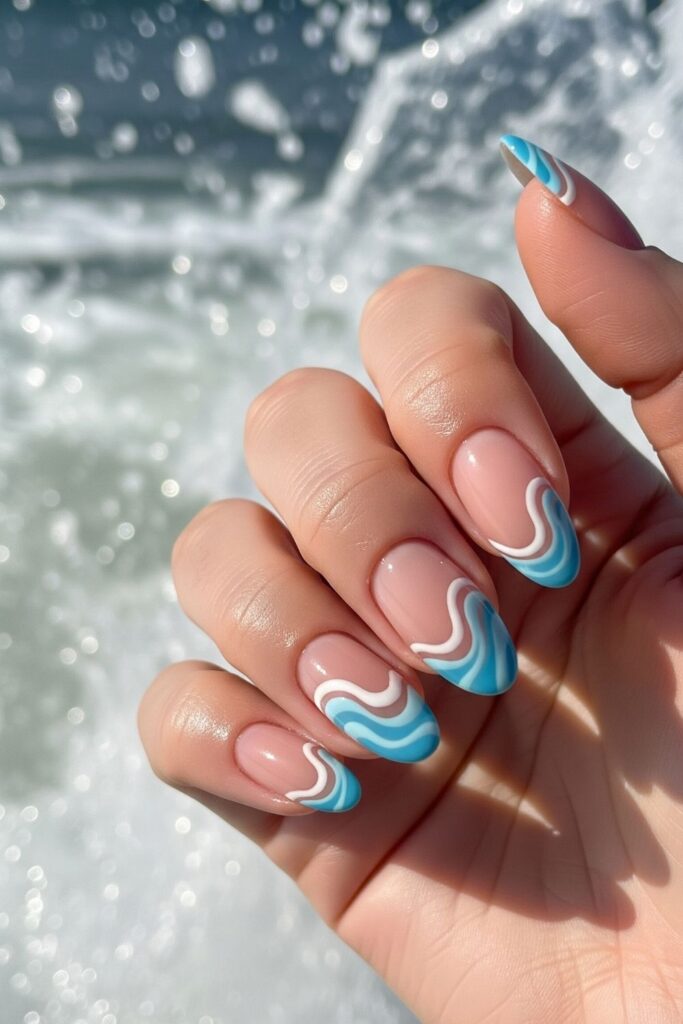
Tools Needed: Nude base polish, blue and white polish, thin nail art brush, top coat.
DIY Steps:
- Nails are shaped and prepped.
- A nude or sheer pink polish is applied as the base.
- Blue and white swirls are painted on the tips with a thin brush.
- Wave-like curves are blended for a fluid effect.
- A top coat seals the design.
13. Sunset Ombre Nails
This gradient mimics a summer sunset from coral pink to tangerine and gold. I love the dreamy vibe it gives. It’s soft, warm, and absolutely summer-perfect.
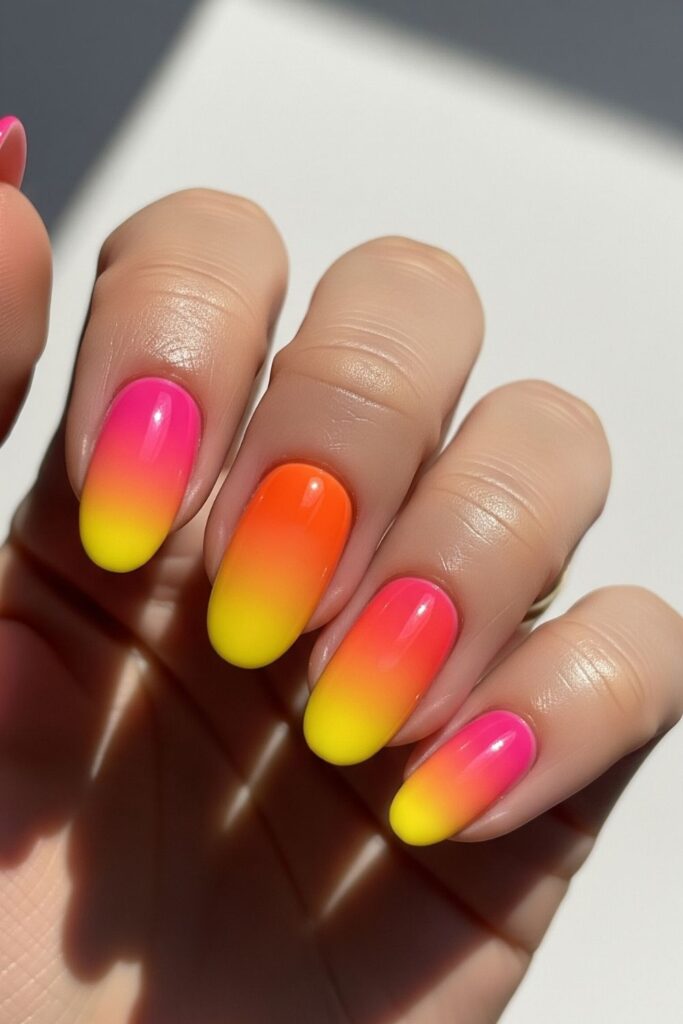
Tools Needed: Coral, orange, yellow polish, makeup sponge, top coat.
DIY Steps:
- Nails are buffed and base-coated.
- Coral, orange, and yellow polishes are painted in lines on a makeup sponge.
- The sponge is dabbed onto each nail to blend the colors.
- Excess is cleaned up, and a top coat is applied.
12. Tropical Leaf Accent Nails
A single leafy accent nail brings exotic vibes without going overboard. I love how it looks effortlessly chic and matches any beach outfit.
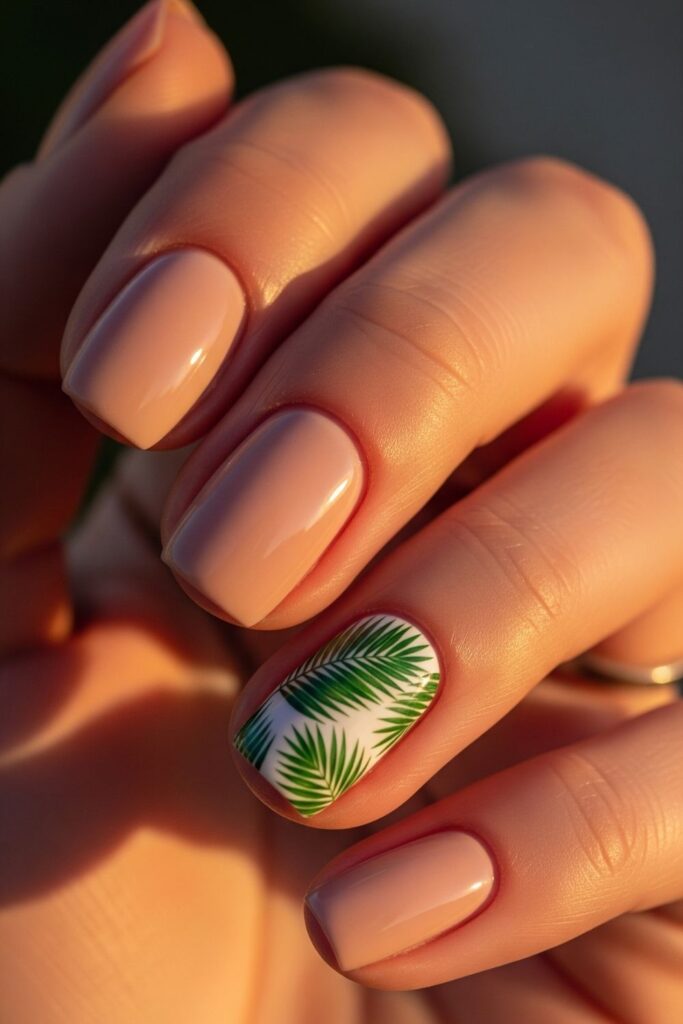
Tools Needed: Nude base, green polish, detail brush or stamping plate, top coat.
DIY Steps:
- Nails are shaped and base-coated.
- All nails are painted nude except one accent nail.
- A leafy green design is added using a fine brush or stamping.
- Once dry, a top coat is added.
11. Watermelon French Tip Nails
Watermelon nails are the cutest way to stay juicy this summer! I love the pop of color and how easily it makes you smile.
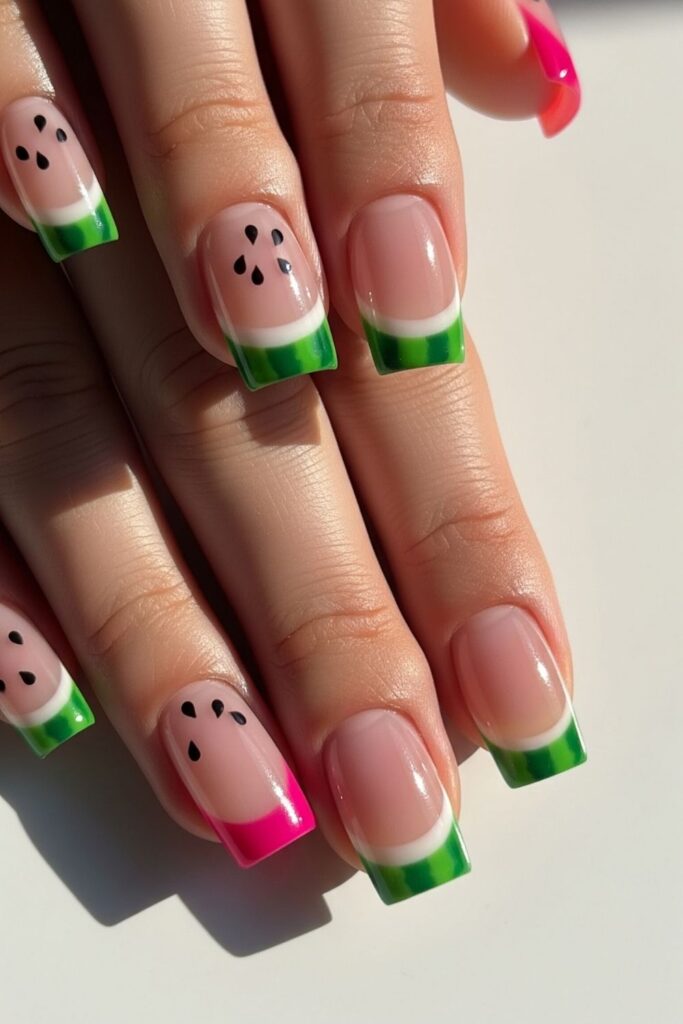
Tools Needed: Pink, green, white polish, dotting tool, thin brush, top coat.
DIY Steps:
- Tips are painted pink, followed by a thin white stripe.
- Green polish is added at the edge to mimic a rind.
- Black dots are added as seeds using a dotting tool.
- Finished with a glossy top coat.
10. Beach Shell Accents Nails
A dainty shell design on one or two nails adds beachy charm. I love how subtle yet summery it looks, especially with pearly shimmer.
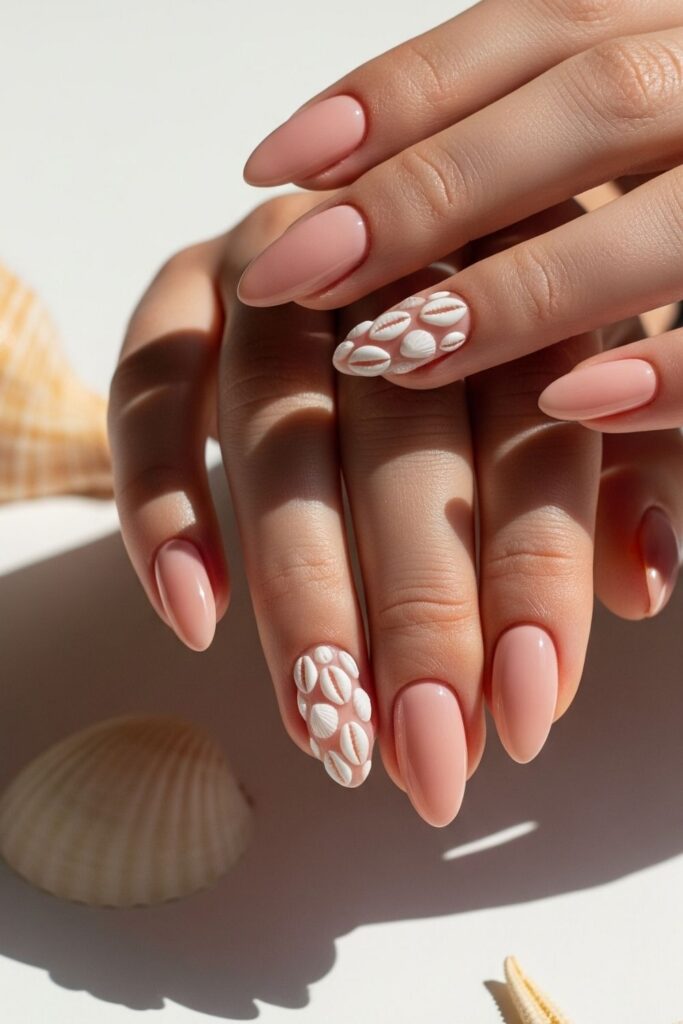
Tools Needed: Nude polish, pearl shimmer, shell stickers or 3D gel art, top coat.
DIY Steps:
- A nude or sheer pink polish is applied.
- Shell stickers or freehand shell designs are added to accent nails.
- A shimmery polish is dabbed on top.
- Sealed with a top coat.
9. Fruit Slice Nails
Lorem ipsum dolor sit amet, consectetur adipiscing elit. Ut elit tellus, luctus nec ullamcorper mattis, pulvinar dapibus leo.
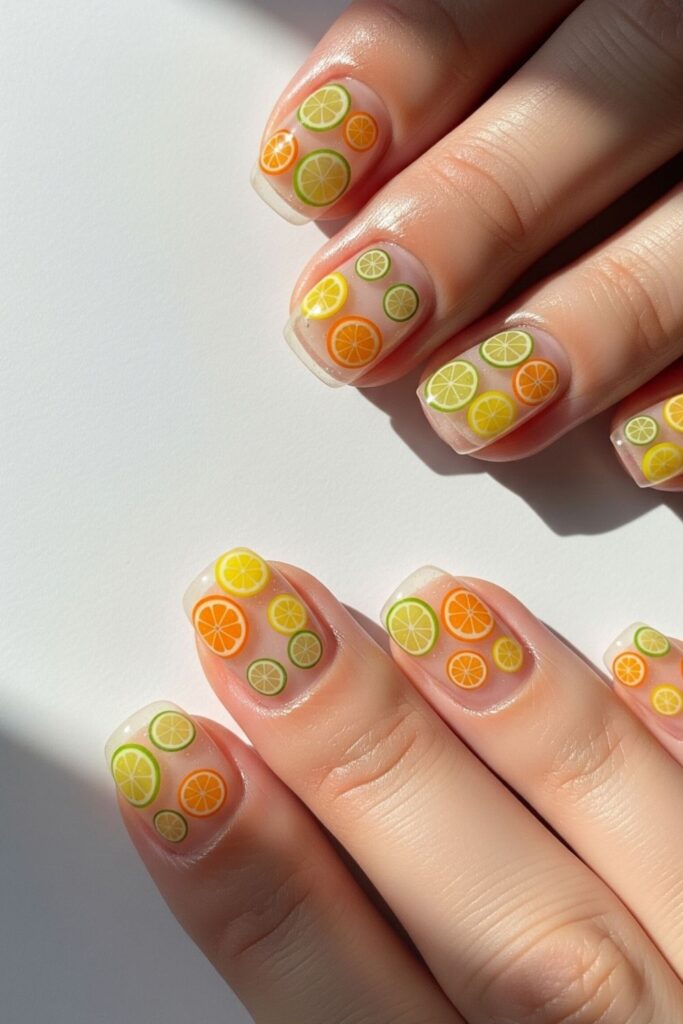
Tools Needed: Clear base, fruit slice nail stickers or fimo slices, tweezers, top coat.
DIY Steps:
- Nails are coated in a clear polish.
- Fruit slice stickers are placed on tips or near cuticles.
- Pressed down firmly with tweezers.
- Topped with clear polish.
8. Neon Drip Nails
These neon drips look like melting ice pops! I love how bold and bright they are perfect for summer parties and poolside days.

Tools Needed: Nude polish, neon polish, dotting tool or brush, top coat.
DIY Steps:
- Nude base polish is applied and dried.
- Neon dots are added near the cuticle.
- Dots are dragged downward with a brush to create drips.
- Finished with a top coat.
7. Sky Blue Chrome Nails
Lorem ipsum dolor sit amet, consectetur adipiscing elit. Ut elit tellus, luctus nec ullamcorper mattis, pulvinar dapibus leo.
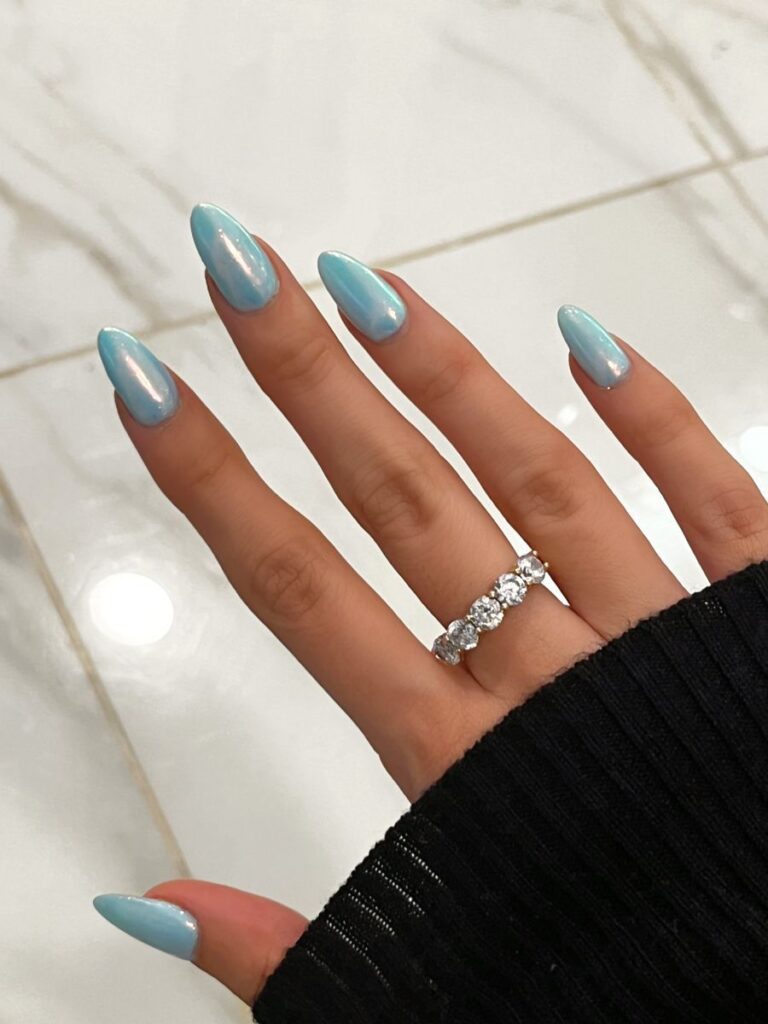
Tools Needed: Blue polish, chrome powder, applicator sponge, top coat.
DIY Steps:
- A blue gel base is cured under UV.
- Chrome powder is rubbed in using a sponge applicator.
- Excess powder is brushed off.
- A no-wipe top coat is applied and cured.
6. Coral Reef Dots Nails
Dots in coral and aqua shades mimic coral reefs underwater. I love the minimalist look that still feels fun and oceanic!
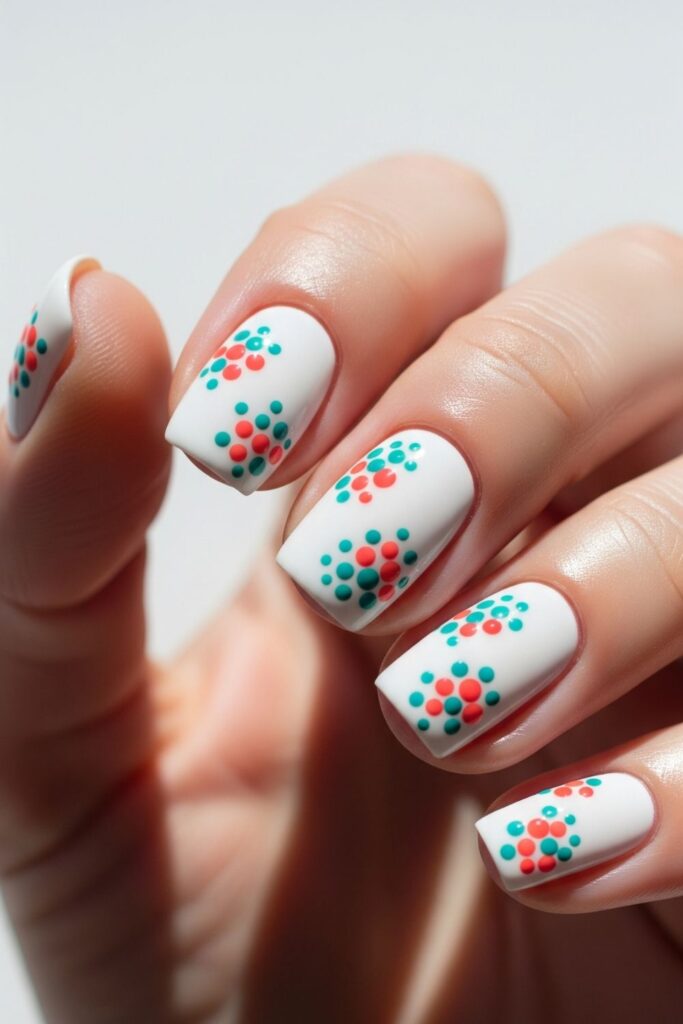
Tools Needed: White base, coral and teal polish, dotting tool, top coat.
DIY Steps:
- A white base is applied and dried.
- Coral and teal dots are added in clusters using a dotting tool.
- Placement is kept random for a natural reef vibe.
- Topped with clear polish.
5. Ice Cream Cone Nails
These sweet little ice cream cone designs make me smile every time I look at them. I love how fun, colorful, and perfect they are for sunny days. It’s a nostalgic summer treat—on your nails!
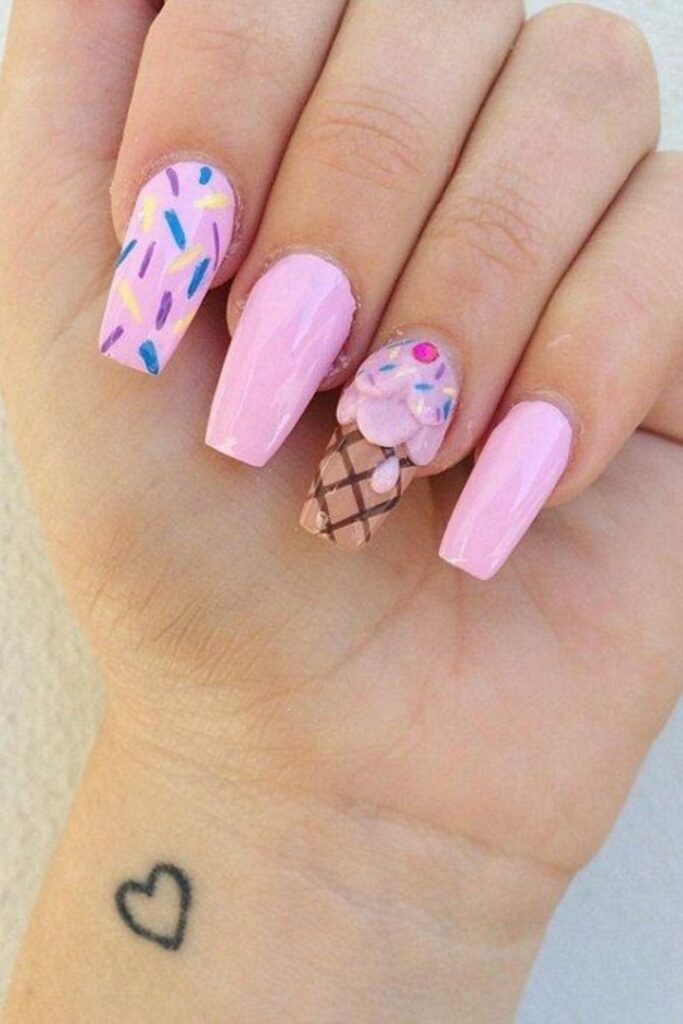
Tools Needed: Nude or tan polish, pink/white/blue polish, thin brush, dotting tool, top coat.
DIY Steps:
- A nude polish is used for the cone base.
- Triangle shapes are painted near tips.
- Colorful “ice cream scoops” are added with polish and dotting tool.
- A waffle cone texture is added with a fine brush.
- Sealed with a top coat.
4. Mermaid Scale Nails
These shimmering, scale-like patterns make your nails feel magical. I love the dreamy sea princess energy and how they catch light with every move.
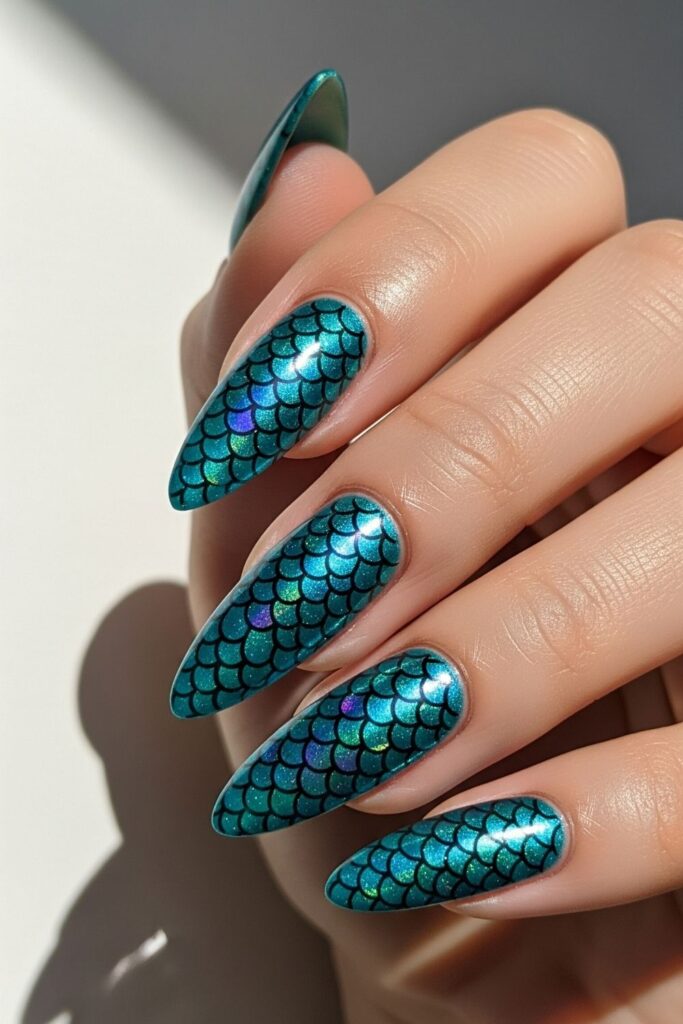
Tools Needed: Iridescent polish, teal or purple polish, scale stamping plate or stencil, top coat.
DIY Steps:
- Nails are painted with iridescent or holographic polish.
- Once dry, scale patterns are stamped or stenciled using teal or purple polish.
- A thin brush can also be used to create scale outlines.
- A shiny top coat is applied.
3. Pastel Rainbow Tips Nails
These soft pastel rainbow tips are like cotton candy sunsets. I love how dreamy and delicate they look while still feeling festive and fun for summer nails 2025.
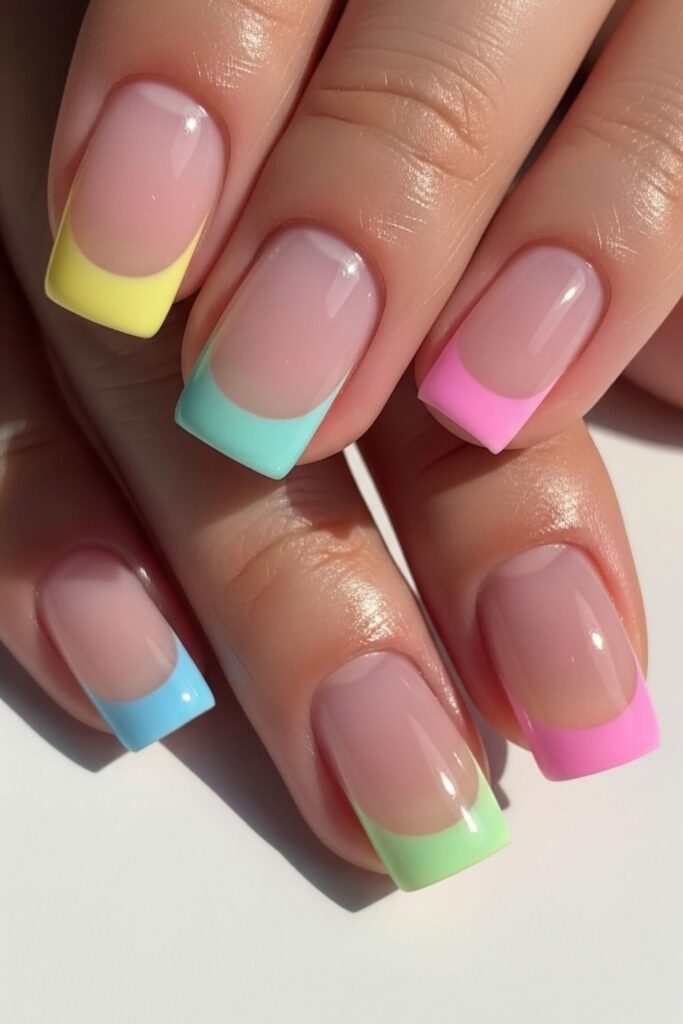
Tools Needed: Nude base, pastel polish in 5 colors, thin brush, top coat.
DIY Steps:
- Nude polish is applied and dried.
- French tips are painted in alternating pastel shades on each nail.
- A thin brush is used for crisp lines.
- A clear top coat locks in the look.
2. Tropical Sunset Palms Nails
The ombre sunset base with silhouetted palm trees makes these nails feel like a mini vacation. I love how vibrant and bold the colors are perfect for beach nails!
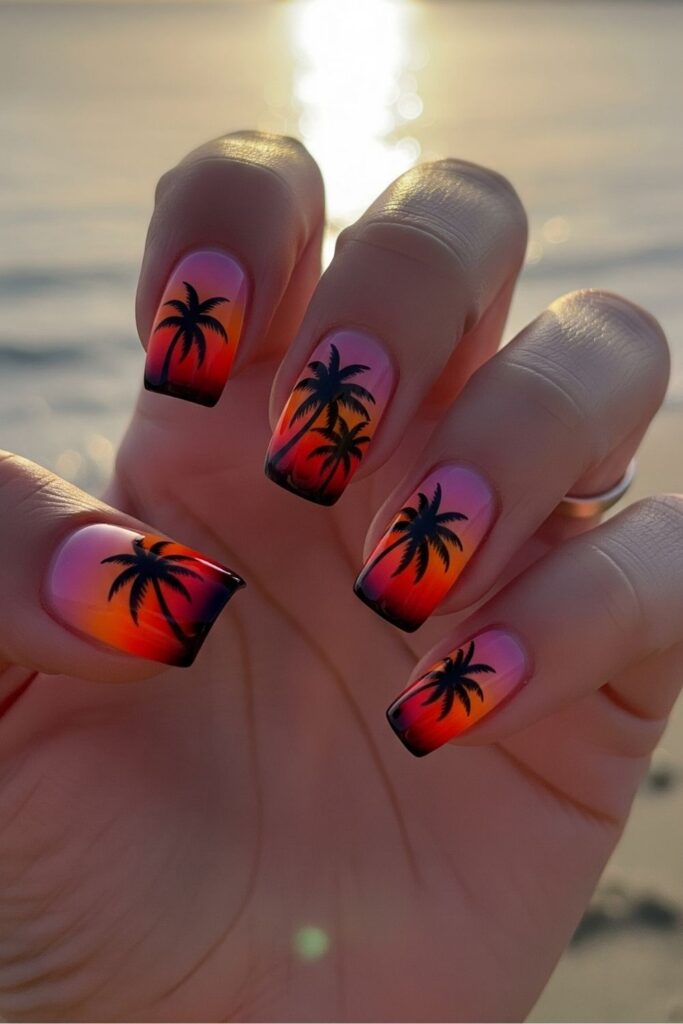
Tools Needed: Orange, pink, purple polish, makeup sponge, black polish, detail brush, top coat.
DIY Steps:
- Orange, pink, and purple polishes are blended on a sponge for the sunset background.
- Once dry, palm tree silhouettes are drawn with a thin brush using black polish.
- A top coat is applied for a glossy finish.
1. Minimal Starfish Nails
These dainty starfish accents are simple yet give strong summer vibes. I love the minimal, clean look with just enough sparkle to feel beach-ready.
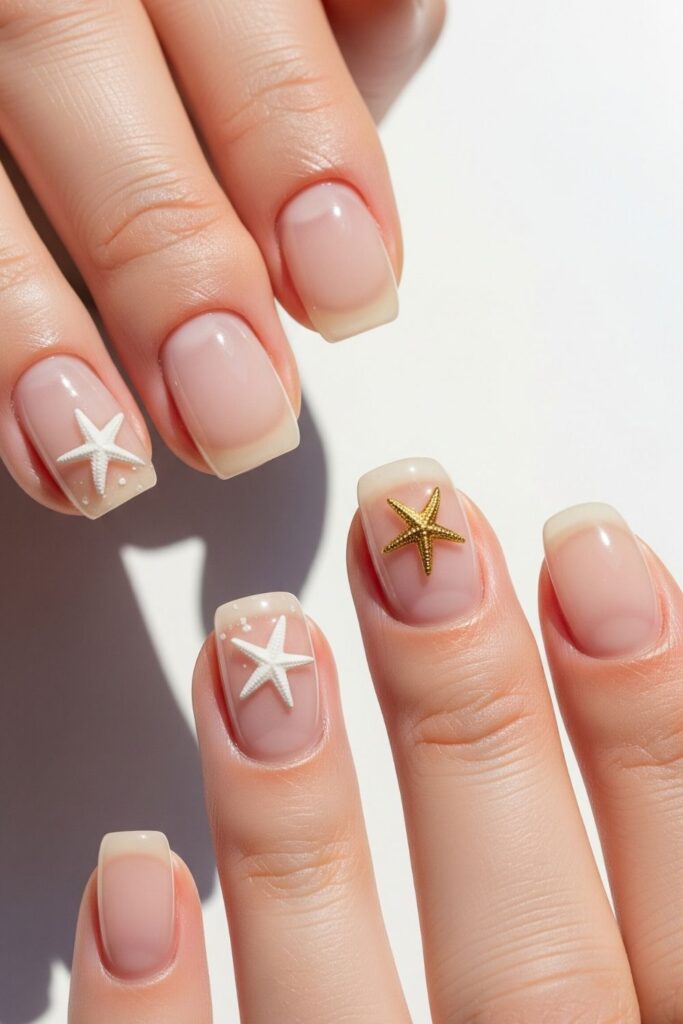
Tools Needed: Sheer nude or pale pink base, white or gold polish, fine brush or sticker, top coat.
DIY Steps:
- A sheer pink or nude base is applied.
- Tiny starfish are added using a sticker or painted on with a brush.
- A bit of gold shimmer is dotted nearby for effect.
- Finished with a glossy top coat.